this pictorial will show me making up a dozen woodies using basic tools and materials, and including a basic primer on arrow fletching.
there are lots of good ways to build wood arrows - this is just my most favorite method.
can't skimp on the wood, it pays to buy premium shafting. surewood douglas fir is my fave - very strong and straight from the get-go. these 11/32" shafts are a full 32" in length, are 55/60# spined and in a 390 to 400 grain weight range.
unlike carbs, where there is a large dynamic spine range (35-55, 55-75, etc), woodies have narrow spine ranges and they are very sensitive to how you shoot. there is no substitute for trying a range of spines and making a selection based on personal performance.
for newbies getting their feet wet in woodie building, my strong advice is to get a test pack of surewood doug fir woods in either 6 spine ranges of 2 shafts each, or 4 spine ranges of 3 shafts each. make up one bare and one fletched arrow for each spine, test them with yer bows. also have on hand different point weights, say from 125 to 200 grains (or more), then using hot melt glue you can swap out point weights to weaken or stiffen the arrow spine. all this testing is gonna make matching woodies to yer bow SO much easier, and get great flying arrows ... promise!
whatever wood you buy, it would make sense to insure they're as straight as can be before working on them. i roll each shaft on a flat surface (corian kitchen counter top) and if there is a high side, i'll hit it with high heat from a hair dryer or low heat from a paint stripper heat gun and compress that high side using either the rounded shaft of a screwdriver, or a hook (big eye screw screwed in a piece of 1" dowel) or my fave, the groove section of a steel guitar slide ...
for each shaft, mark the grain orientation with a pencil - that is, noting one side that has vertical grain when looking at the end of the shaft. it's the vertical grain that needs to touch the side plate of the arrow shelf because that's where the shaft is spined and strongest. either end of the vertical grain will do. no spine meter required.
either end of the shaft could be for the nock or point. if the shaft has 'run out', where you can see a grain 'feathering' on one or more sides of the shaft, orient the shaft so that these 'feather(s)' point *toward* the nock end ...
get yerself a shaft tapering tool. a cheap 'pencil sharpener' type will get the job done just fine. this one i'm using is a more expensive bear paw tapering tool, but it doesn't do any better a job than a cheap plastic one. i also use a tapering guide for my disc sander - they're easy to make and work well, too.
get a slat of wood about 32" or so long. tap in a finishing nail at one end. about 8" or so down from the nail make a mark on the wood. if you want to cap the arrow, use this mark as a reference point to lay down a layer of painter's masking tape (1/2" to 1" width) to separate the cap area from the foreshaft. the arrow nock is NOT glued on - just stuck on so that you can get an accurate cap/crest area mark. note that this is entirely optional. here's how that's done ...
this next step is also optional - coloring the cap and foreshaft - you could do one, or the other, or as i'll be doing, both. rather than get into paints and dip tubes and sprays, let's do it the easy and good looking way - wood stains. use whatever type and color stains you like. i like using water based aniline dye stains and here i'll do the cap in a light amber and the foreshaft in a darkish walnut. since this is a wipe on process, you'll need at least one rubber glove, either kitchen or surgical types. oh, do use 100% white cotton (t shirt) for the wiping 'pad', 2" to 3" square is fine. and use a separate pad for each color! the pictures tell the story ...
there are any number of ways to allow the wet stained shafts to dry, here i'm using a block of polyethylene foam to push in the last 1.5" of shaft ...
i'll let these dry off for a few hours and then on to the next part of the finishing step!
remember, the staining of the shafts is *optional* and not at all needed. the other 6 shafts of this dozen surewoods are gonna just get clear coated, no staining at all. fir takes clear well, and will kinda mute down and darken the raw wood color to a nice parchment-like hue after a few wipes of nothing more than clear.
unless you stain the entire shaft, one needs to be a tad careful when clear coating not to bleed the stain from one part of the shaft to the other. i'll be using three cotton wipe pads again, one for the unstained shafts, one for the amber stain of the cap, and the last for the walnut stained foreshaft - don't mix them up or you'll get color bleeds!
first step is to *lightly* steel wool buff all the shafts, both the stained and not stained. i use the ultra fine 0000 steel wool, and cut each pad in half as a full pad is overkill and you get to stretch the wool use. i use one side of a half pad to buff the amber cap, and the other side of that same half pad to buff the walnut foreshaft - don't mix them up! after wooling, use a paper towel to lightly rub down either the entire unstained shafts, or use separate towels for each color stained area of the stained shafts (again, so the stains don't bleed).
next up, the clear coats ...
i'll do the clear wipes on the unstained shafts first. put on yer rubber glove(s) a clean 2" to 3" square of 100% white cotton t-shirt, fold over to make a pad, shake the can of min-wax gloss wipe on polyu, pop the top and get the pad wet (not damp and not dripping wet), hold the shaft at where the pointed end will eventually be, wrap the pad a bit around the shaft and twist and wipe from the nock end on down.
you don't need to wipe right down to the very end of the shaft, unless you require a full 32" arrow. wipe to within 2" to 3" of the end of the shaft (for up to a 30" long arrow). hold the freshly wiped shaft by the nock end, push into the foam block for drying. i do this with just one glove for the wiping hand.
for the stained shafts - hold at the cap end, wipe the foreshaft first and don't go beyond the masking tape! when done, push each shaft into the foam block. when all shafts have had their foreshafts wiped with clear, get a fresh new wiping pad, and clear wipe the cap area of the shaft while the shaft is held in the foam block. too easy! allow to dry for a few hours.
after the clear dries, *lightly* buff each shaft with 0000 steel wool - use a separate piece of steel wool for each stain color! lightly rub each shaft with a paper towel - use a separate towel for each stain color!
do another clear coat wipe again, as in all of the above.
after the second wipe dries, for the stained shafts, remove the masking tape that separates the cap from the foreshaft. lightly steel wool buff the entire shaft, from nock end to point end - no need to be concerned about color bleeding - and lightly paper towel rub down. notice how the stain colors deepen and look more vibrant as more clear coats are applied. i loved stained arrows as opposed to opaque painted ones - i just prefer to see the natural wood grain.
do a third wiped on coat of clear.
three coats of min-wax clear is more than enuf to fully seal the shafts. i usually go for a fourth coat. your choice to either leave the last coat glossy or buff down with the steel wool and paper towel for a muted satin finish.
after i'm done with all four coats of clear, next up - glue on the nocks, cut the shafts to your proper draw length, taper for the points, add cresting using sharpie pens (optional). then on to fletching - we'll do all three flavors of fletches - store bought preshaped, chopped, and burnt - in both three and four fletch configurations. ALL fletches will be adhered with bohning fletch tape! then on to pointing up, checking for shaft/point trueness/straightness.
third coat of clear administered this morning. fourth coat goes on tonite. will be ready for the next part of the process tomorrow.
fourth and final wipe of clear on all 12 shafts, cured nicely overnight.
stained and cleared, cleared only, raw wood - shown so you can see the color differences ...
... you can see that clear alone will mute the brightness of raw wood.
push a nock onto one of the shafts (don't glue!), set the nock into the finishing nail of yer shaft/arrow sizing jig ...
... and mark at the length to cut the shaft down to arrow size. you want to make that mark at 3/4" more than the final length of each arrow. i want these woodies to be 29-1/4" long, so i made a pencil mark at 30" ...
... mark up for each shaft first. then cut the shaft right at the mark, either by rolling a knife on the cut line mark and scoring deeply before snapping off the excess, or cut off with a saw blade ...
add the point taper ...
after all the shafts have been point tapered, i like to put some finish/sealer on the freshly cut point tapers. either some clear polyu, or duco cement. or, as i just did, by wicking in some water thin cya (CYAnocrylate super glue) - this seals and hardens the point taper at the same time.
next up - fletching!
i use 'magic markers' for cresting - chisel point sharpie pens are my faves, along with a pentel silver pen. this is fast, easy and good looking crest. the downside (you knew that was coming!) is that i have yet to find a clear coat that won't bleed the marker colors. so, i leave the cresting as is, and it will wear a fine line where it contacts the shelf almost immediately. no big deal for me.
if you want cresting that will take some punishment and last, the answer is to use a resin based paint (lacquer, acrylic, enamel, etc) and then spray clear coats over to seal. this requires a few small pots of opaque paint colors and appropriate thinner and compatible spray clear, and a few good sable cresting brushes. been there, done that, don't need the added expense and time. i'll stick with sharpie cresting and live with the 'wear line'.
i did the testing - so be aware that clear coat light spraying of lacquer or polyu or acrylic on marking pen cresting will NOT work - the ink will run and bleed.
ok, time for cresting and fletching - or is it the other way around? which to do first? imo, doesn't matter, but as you work on woodies, one or the other might take preference. i'm gonna do the fletching first, cresting last.
all fletches will be adhered with bohning fletch tape, followed by a dot of duco cement on each end of the feather, not so much to hold down the fletch at those critical points, but to smoothly transition the quill base to the shaft.
there's also the nocking and pointing to consider as well. one could pressure fit a nock for fletching and then glue on the nock afterwards to get a precise alignment with the feathers.
typically, a fletching jig's nock receiver is set and locked in position for the type of offset or helical for a particular length of feather. change one of those two parameters and the nock might not align with the fletching as you'd like after the fletching is adhered to the shaft. now, this isn't an issue at all with carbons since [a] carbons are 360 degree uniformly spined, and [b] a twist of the carbon's nock makes for instant realignment. not so with woodies as they are not 360 degree uniformly spined! if you glue on the nock, better make sure the taped or glued feathers will align properly. and if the nock needs to be rotated, don't rotate it so much as to miss the sweet stiff spine spot.
i'm gonna use two relatively 'cheap' polycarb fletching jigs - an old martin j8 and a rather new bohning bpe. the j8 will be used to do a four fletch, li'l chopper chopped 4.6" banana left wing processed trueflights, 75x105 configuration with slight 1 degree offset. the bpe will do up a three fletch, young burnt 5.25" gray barred trueflights in a custom shield configuration with lots of left wing helical. both of these jigs have been used quite a lot and each is set up to fletch the arrangements just described. to change those settings, to use the j8 for helical 3 fletch and bpe for offset 4 fletch would mean taking the time to set up each for their new fletch configuration use. which is one reason to have a fletch jig set up for a style and type of fletch and shaft, and changed.
here's a gaggle of just chopped 4.6" yellow banana fletches, and 5.2" sections of full length gray barred fletches that are prepared for fletching and young feather burning.
more tomorrow morning, as i fletch up the first arrow ...
banana 4 fletch
using a modified lil chopper banana high profile feather chopper (a new base plate was made from 1/8" plywood, in order to shorten the fletch length, and reduce the height), place the feather into the jig and hold it with a few fingers. notice that i prefer to chop feathers with the 'concave' side of the feather up ...
holding onto the feather, use yer other hand to lower the chopping blade and hold firmly enough so the feather won't move ...
give the blade block a good, sharp whack with a mallet or hammer ...
as mentioned b4, the nock can be pushed on for a friction fit during fletching and then aligned and glued later, or glued on first - i choose to glue on first because my jig's nock receiver is well set up for an offset 4 fletch.
after wiping down the cap area of the shaft (where the fletches go) with naphtha (lighter fluid) on a paper towel to remove any finger oil, i've placed a fletch into the fletch jig's clamp, and i'm doing a 'test run' to make sure the fletch quill will position itself properly on the shaft and that it's the proper distance from the nock.
you will need to spend a bit of time and effort to tweak the clamp so that the fletch lies well on the shaft. with a straight fletch clamp, it is either set dead straight (not recommended), slightly offset in the direction of the fletch (i.e. - left wing feathers are offset to the left side). if a helical clamp is used, take extra care in making *sure* that the entire base quill of the fletch makes contact with the shaft. if you don't get the fletch quill to lie dead against the shaft, you will have problems. this matters for using either fletch tape or glue - so make this an important priority!
when it all looks good, mark the clamp with sharpie pen where the back end of the feather goes, for consistency (i used a black pen mark for this fletch type) ...
when all looks right, remove the clamp (with feather attached) and at this point i typically will wipe down the quill base with naphtha on a piece of paper towel to remove any lingering finger oil, line up the fletching tape with the quill base and lay it down ...
with sharp scissors, snip off the tape at both ends of the fletch, close to the quill ...
run a finger down the length of the fletch tape, pressing fairly hard - do it again to be sure ...
use an xacto or knife blade to lift up the fletch tape protective film, then pull off ...
place the clamp onto the jig's magnet, get the jig lined up in the proper position, and keep it away from the shaft ...
push down the clamp onto the shaft, press *firmly* ... press *firmly* again, to make sure ...
squeeze the clamp and remove from the feather ...
turn the jig's nock receiver, rotating the shaft towards you, and attach the next feather in the same fashion ...
when all the feathers are attached, remove the arrow (hey, NOW it's an ARROW and not a shaft!) and *firmly* press down the full length of the feather from front to back - i do it right on the feather barbs, press them right down to the quill, won't hurt them at all, but if it bothers you to press down on the barbs then just press down on the quill side edge with yer finger nail ...
and finally, a dot of glue at each end of the fletches ..
first woodie banana 4-fletch done ...
... fletch up the next 5 shafts with 'naners!
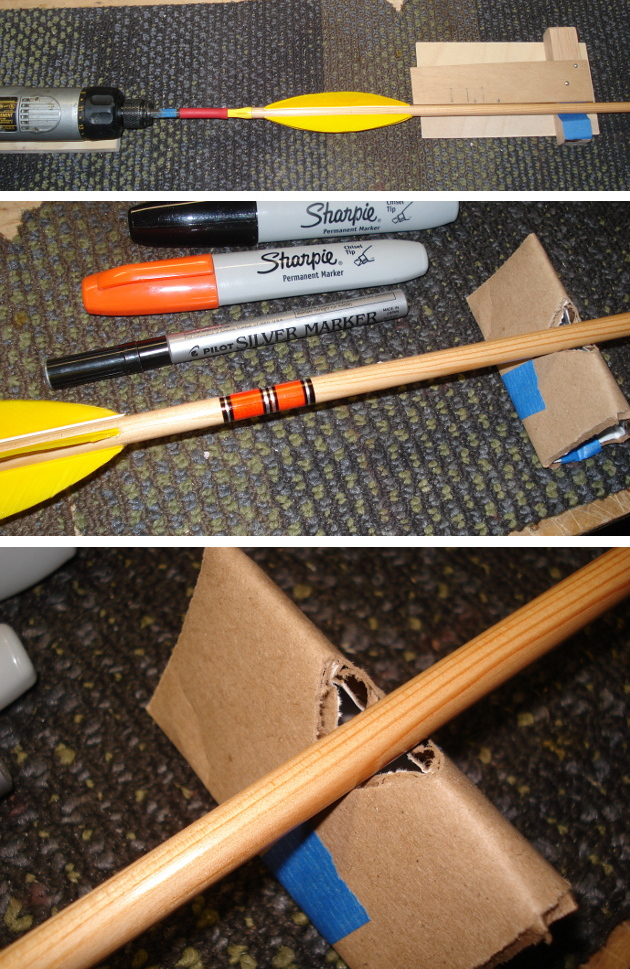
cresting with sharpies
to mark the same cresting location on each arrow, lay down on your arrow measuring tool and mark the meauring tool where you would like the crest to start and end, then transfer those marks to each arrow ...
the diy "cresting machine". simply an electric screwdriver (set so that the rotation of the arrow is away from you), with a piece of 3/8" surgical tubing over the screwdriver phillip's head bit and over the arrow nock that acts as a "transmission coupler". make up a "V" block cradle for the arrow out of wood or foam or whatever - even a "V" notch in a piece of folded cardboard works quite well. i fancied this one up a bit with an extended piece of 1/8" ply "guide" store predetermined cresting marks, but since we used the arrow measuring tool to precisely lay out where the cresting starts and ends on the shaft, this is not necessary.
i'll begin laying down a crest background main color using an orange chisel point sharpie, sweeping from the left crest pencil mark (on the shaft) and ending over at the right crest pencil mark (on the shaft) ...
there is no "drying time" required, so i switch over to the black chisel marker to lay down the margin stripes ... i freehand added a center stripe, with stripes to the left and right of it ...
now i'll add the silver highlight lines - this really makes a crest look great and imo is mandatory ...
i also added a tiny crest between the nock and fletches, using the same colors and scheme, just done freehand with no guide ...
all done - not worthy of an arrow contest, but looks great (to me) and makes a bland arrow look kinda nifty ...
up next - how i fletch for feather burning. i'll do a classic 3 fletch helical shield burnt cut.
burning feathers
i've sharpie crested the remaining 6 woodies, and even did an under-fletch crest. i'll be fletching up with trueflight graybarred turks and burning them to shape after they're on the shafts. the 3 fletches for each arrow will be 5-1/4" long and i've created a 'fat' hi-back shield shape in a new nichrome burning wire for the young burner. i'll be using a cheap bohning fletching jig with a left wing helical clamp. as always, feathers will be stuck on with bohning fletch tape.
first, cut cut down a buncha full length trueflights to 5-1/4" lengths. i like to angle the front of the quill back towards the nock end ...
... and the back of the quill towards the point end - these angles make for a better transition of the quill to the shaft.
this part is the same as i did for the 4-fletch banana fletching - put a shaft into the fletching jig, feather into the clamp - note there's a mark on the clamp where the back of the fletch lines up with, put tape on the quill base, remove the tape's plastic backing, and the clamp onto the jig, press down *firmly* and then do it again ...
do the same for the remaining two fletches - pull off the clamp, rotate the jig for the next feather, put a new fletch into the clamp ...
when all fletched up, pull out the arrow and snip off the rear of the feathers with a scissor to make it easier for feather burning ...
whether it's a new wire shape or an old one, always check the the wire with a bare shaft of the type yer about to fletch, to make sure the wire is just barely away from the shaft, then load in a feathered shaft ...
my feather burn connects to an on/off momentary footswitch, so i tap and hold the footswitch as the wire heats up and when it just starts to glow orange-red i carefully rotate the shaft to trim all three feathers, and the remove weight on the switch to stop the wire heating up, and remove the arrow ...
a 3 pack of burnt feather woodies with fat helical fletchings ...
another 3 pack of burnt feather woodies with fat helical fletchings hot off the burner not 10 minutes ago ...


![[Smile]](smile.gif)


![[thumbsup]](graemlins/thumbsup.gif)
![[Cool]](cool.gif)