This article is mainly for newbies, but also for
those just interested in basic trad archery tackle criteria and
selection. The focus is on barebow archery as used for traditional
bowhunting, with longbows and recurves. The best thing a budding archer/bowhunter can do is to seek help from a qualified
mentor or coach who is well versed in the traditional side of archery
and bowhunting. One-on-one assistance will insure acquiring the right
tackle, the right setting of your gear, and learning fundamental *traditional* archery form
as it applies to hunting. Doing so can save enormous amounts of time
and money. Seek out help via local archery clubs, archery events, and
traditional archery shops.
In a hurry? Here are the key important points ...
1. Identify your dominant eye.
2. Seek a knowledgeable traditional archer/bowhunter to help with your gear selection, setup and learning how to shoot.
3. Traditional bowhunting starts with having consistent accuracy at realistic hunting distances, utilizing razor sharp cut-on-contact broadheads.
4. Read all of the text below.
5. Have fun!
The very first thing to learn is which of your eyes is the dominant one
- the one eye that focuses directly and clearly on an object. Hold a
hand about a foot in front of your face, make the "OK" sign circle by
touching thumb and forefinger, use both eyes to center a distant object
within that circle, close your left eye - if the object is still within
the circle, you're right eye dominant; vice versa if the left eye
centers the object. If you're right handed and right eye dominant, or
left handed and left eye dominant, no problem. Generally, right eye
dominant people should enter shooting sports as right-handed
participants. Left eye dominant people should participate as lefties.
Exceptions can be made to this general rule, but most of these
exceptions have to do with physical adversities.
PREAMBLE
If you are a budding new trad archer/bowhunter, you
will undoubtedly have many things to learn. Covered below are all the
gear/tackle basics. There is much more. However, it is strongly
suggested to avoid anything that will only complicate your learning
curve. Stick to the items listed below and do try to seek local
one-on-one personal assistance with choosing a stick bow, finding the
right arrows for your bow, and learning proper archery form.
SAFETY
Bows and arrows are lethal weapons. Even minisucle
light draw weight kid's bows can launch tiny arrows that have the
potential to kill humans, let alone critters. Use common sense. Here's
a link to a good LIST of archery safety concerns. Please read it.
THE BOW
We should all strive to employ a trad hunting stick
bow that has a holding draw weight we can manage. That is, a
comfortable holding weight that allows for consistency, which leads to
accuracy, which leads to accurate shots and quickly killed game. This is
a cornerstone of trad bowhunting, and there are no exceptions. Minimum
bow draw weight will be dictated by the bowhunting laws in the area(s)
you'll hunt, and the type of game you will hunt. However, you may
quickly find that a hunting weight stick bow for medium game such as
deer or hogs is too much to control, and if so, a much lower weight
starter bow will absolutely be required. You simply can not learn the
basics of good archery form if the bow has too much holding weight that
can't be controlled. Please read that again - this is very important!
Longbow or recurve? Doesn't matter. Pick one that makes you happiest.
What is the difference between a recurve and a
longbow? Here's the general consensus - if only the bowstring loops
touch the limb nocks, it's a longbow - anything else is a recurve.
Recurves are very efficient stick bows that
typically promote faster arrow speeds than longbows. Well then, why
bother with longbows, isn't faster better? Not at all necessarily,
because speed alone doesn't kill - consistent accurately placed sticks
with very sharp points do.
There are essentially two types of longbows - straight and hybrid.
"Straight" longbows have limbs that are basically
straight or perhaps with a bit of overall tapered reflex ("back set") or
string follow ("belly set"). These are "classic" longbows that form a
"D" shape when braced. Think: English longbow (ELB), American flat
longbow (AFL), Howard Hill longbow.
"Hybrid" longbows have both reflexed limb ends and
deflexed risers. This improves the overall efficiency of the bow, for
faster arrow speeds, while still imparting a large measure of bow
"stability" during the shot. Mild r/d hybrid longbows typically have that "D" braced classic longbow limb look when braced. Aggressive r/d hybrid longbows
will typically show some reflex near the limb tips when braced, and
allow even faster arrow speeds. The milder r/d longbows are typically
somewhat more stable than the more aggressive variety (aggressive
hybrids are closer in performance and aesthetics to recurves - and some
will outperform recurves in the speed category).
Stick bows have a number of measured qualities,
such as "stability" during and after the shot, "energy/speed" imparted
to the arrow via the limbs, "noise" created during the shot, and "hand
shock" after the arrow clears the riser.
Stability - the ability of the bow to remain as neutral as possible in the bow hand after the string is released.
Energy/speed - how much energy is imparted to the arrow as transmitted via the bowstring and bow limbs.
Noise - the decibel noise level after the string is
released and as the arrow clears the riser; recurves typically have
limb "slap", since the bowstring makes contact with the reflexed ends of
the limbs, longbows don't have that issue.
Hand shock - any amount of energy that is not
transmitted to the arrow is absorbed by the bow limbs and riser, and is
transmitted to the bow hand.
No matter what type of stick bow you choose,
be very careful choosing the holding weight!
be very careful choosing the holding weight!
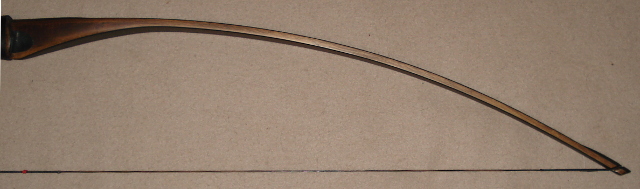
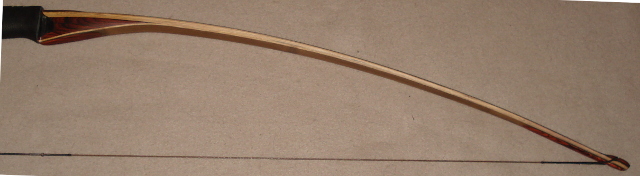
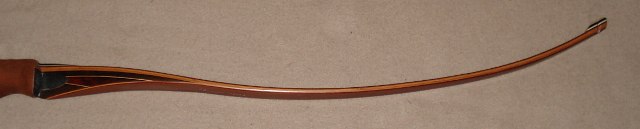
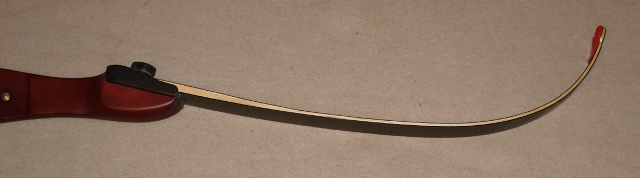
Bow limb images, braced and unbraced.
American Flat Longbow ("Howard Hill style") ...

Hybrid mild r/d longbow ...
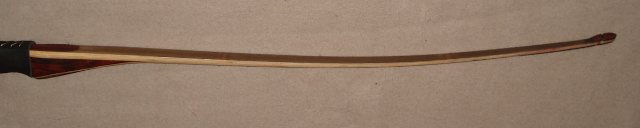
Hybrid aggressive r/d longbow ...
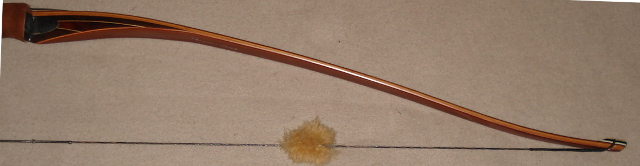
Recurve ...

Bow Length. A proper length hunting stick
bow for a specific archer is dependent on some basic criteria - your
draw length, the type of stick bow, and perhaps special bowyer design
parameters. In almost all instances, longer stick bows will be more
stable, forgiving and easier to shoot. Longer may not be the best
choice if hunting from tree stands or blinds. Choose wisely!
Here are some guidelines for typical recurve bows ...
RECURVE
| |
| Bow Length | Draw Length |
58" | 24" to 27"
|
60" | 25" to 28"
|
62" | 26" to 29"
|
64" | 27" to 30"
|
66" | 28" to 33"
|
As you've already learned, longbows are typically divided into three types - here are some guidelines for typical "straight" AFL's (American Flat Longbows - i.e. "Howard Hill") ...
AFL LONGBOW
| |
| Bow Length | Draw Length |
64" | 26" to 27"
|
66" | 27" to 28"
|
68" | 28" to 29"
|
70" | 29" to 30"
|
... and here are some guidelines for typical "hybrid mild r/d" longbows ...
MILD R/D LONGBOW
| |
| Bow Length | Draw Length |
60" | 26" to 27"
|
62" | 27" to 28"
|
64" | 28" to 29"
|
66" | 29" to 30"
|
68" | 30" to 31"
|
... and finally, some guidelines for typical "hybrid aggressive r/d" longbows ...
AGGRESSIVE R/D LONGBOW
| |
Bow Length | Draw Length
|
56" | 26" to 28"
|
58" | 27" to 29"
|
60" | 28" to 29"
|
62" | 29" to 30"
|
64" | 30" to 31"
|
Please Note: There are
other, special design short length stick bows that will allow for much
longer draw lengths than shown above! Some stick bow lengths safely
allow for slightly longer draw lengths but may not be as smooth on the
draw as if used with a longer bow length.
As an example of an extreme hybrid aggressive r/d longbow, below is the 54" length TimberGhost TD
that was used by Curt Cabrera to win the coveted Overall Champion at
the grueling 2013 Muzzy Shoot ... Curt has a 29" draw length!

Bow holding weight is based on your draw
length. For a newbie, trad bow draw length can be tricky if not elusive.
Changing your draw length changes the bow holding weight! Know your
trad bow draw length! Seek one-on-one help from local, knowledgeable
folks - there is no substitute for this! Try before you buy is always
best, but not something one can do all the time (and one reason why
there's a good turnover of used stick bows for sale). You NEED a *reasonably*
light holding weight for your first bow, perhaps only 35 to 45 pounds
for a man, and 25 to 35 pounds for a woman. This will make learning
correct form much easier. If this first bow is a three piece take down,
getting a new set of heavier limbs will be less expensive than buying
an entire new stick bow. If you wish to hunt with your first trad bow,
it will need to meet the minimum legal holding weight/cast requirements
for your hunt venue location. To shoot well, and/or to hunt, or both?
Again, if you are not in control of your bow's holding weight at your
draw length, you are "over bowed" and you will compromise your archery
shooting/hunting.
Be realistic and wise when it comes to selecting your trad bow's holding weight!
Draw length is technically the distance
between the arrow's nock groove and the forward most inside of the
handle grip, then add an additional 1-3/4". If at full draw this
distance measures 26-1/4", adding 1-3/4" yields a 28" draw length. This
is a cumbersome way of determining an archer's draw length. Let's make
it easier and just as accurate. Your draw is measured from the depth of the arrow's nock to the front of the bow's arrow shelf.
You can check draw length with a long arrow or dowel (that has a notch
in one end to simulate the arrow nock) - mark the arrow/dowel in 1/2"
increments from the nock's notch, starting at 25" and ending at 30".
place a clothespin at the 25" mark, place the arrow/dowel on the
bowstring and draw back - the clothespin will move forward and will stop
when you reach your draw length. Note the distance. Add 1/2" or more
to this distance for your real hunting arrow's length (to allow for a
broadhead). Take note that as a trad newbie, your form will change, and
most likely so will your draw length!
Stick bows are marked with a holding weight, i.e. - 43# @ 28" (or typically labelled 43@28)
- this means the bow will hold at 43# when pulled back 28". For each
inch of draw more or less, add or subtract 3#. Be aware that the
labeled weights on bows may be off by as much as +/- 1 to 5 pounds - or
more! The ONLY way to know what weight you are holding at FULL DRAW
is to use a GOOD and TESTED bow scale. Anything else is a crap shoot!
REPEAT: If you start off with more holding
weight than your untrained muscles can handle, you will be weight
lifting and not shooting archery. "Overbowing" (attempting to use a bow
that is more draw weight than you can effectively handle) is a quick
way to poor accuracy, learning bad form habits that will plague you a
long time if not forever, disappointment, frustration, and maybe even
physical hurt.
If you are a compound archer starting off in trad archery,
be aware of two important things - (1) your draw length may shorten,
particularly if you're going from a release aid to fingers, and (2) the
holding weight of a compound can be between 10% and 90% of the
compound's rated weight at your draw length and you must take that into
serious consideration! If your current compound is rated at 65#, you
could easily be holding less than 15# at full draw, and if that is the
case you may have difficulty holding even a 45# stick bow at anchor!
You should be able to hold your stick bow at full draw for at least a
few seconds without serious shaking! Try before you buy!
As discussed above, bow length should be based on
your draw length and the design of the bow. There are some special,
really short length bows that are designed for longer draw lengths, if a
short bow is a requirement. For the most part, there are bowyer
recommendations for bow length. If you're up in the air (a tree stand)
or dealing with lots of thick bush (ground blind or stalking), shorter
might just be better for you. In the long run, there is at least a fair
amount of subjectivity to bow length. When in doubt, always go longer.
A one piece or take down bow? The real
consideration for a take down bow is travel, and air travel in
particular. T/D bows just make the bow hauling much easier for flying
out to a hunting venue. However, the cost of a take down can be
considerably more than a one piece.
Take down two piece or three piece? Geez, more
stuff to consider! There might typically be more inherent mass weight
with a three piece, and they have their own aesthetic "look",
particularly with a three piece longbow. Most two piece bows really do
look like one piece once they're connected - a much more pleasing
aesthetic look, but a tad more weight than a one piece, yet less weight
than a three piece. Some folks like the added mass weight of a T/D bow,
others like 'em lighter. More subjective stuff.
What trad bow? The quick, good answer is one of
recent manufacture. Older stick bows from the 50's to 70's (and some
even up to the 90's) can have issues, as can any used bow. Most of
these older bows will not be safe with modern HMPE bowstring fiber. For
the first time trad archer/bowhunter, avoid self, board and composite
wood bows - they require more care than a composite wood/glass stick
bow. Confused? That can be understandable. Seek knowledgeable help.
Trad archery clubs are best, as well as online advice from trad forums
such as TradGang.com
OK, you've got yourself a nice WhizBang stick bow,
it feels comfortable to draw, you can hold it at full draw for a few
seconds without shaking (well, not shaking too much - a little is fine
and something you should be able to correct as your muscles become
conditioned) ....
Now, learn how to shoot. Again, seek local
assistance, or better yet an archery coach, and one that is well versed
in traditional archery - there is no substitute for this as well.
Whether you employ split finger, or a three fingers under the nock
string grip, that's your subjective choice. Shooting a stick bow
essentially means nocking an arrow, gripping the string/arrow, drawing
the arrow to your draw length, holding at full draw (this "holding" can
be for a split second, or seconds), aiming at the target (or game),
releasing the arrow and "following through". What was not included in
the previous sentence is "stance" - how your body aligns with the
target. Target archers have the luxury of a fixed stance, which is
typically both feet in line with the target. Bowhunters learn to shoot
accurately from many body positions, from standing, to kneeling, to
sitting, to lying down. You MUST learn and acquire consistent accuracy
at reasonable hunting distances, and shooting in positions other than
the "target archery stance". For most trad bowhunters, this means
hitting a 9" paper plate at 15 yards, at the least.
The String Grip - how the string hand addresses the string. There are two recognized styles: "split finger" = pointer finger above the arrow nock and middle and ring fingers under the arrow nock (also called "Mediterranean style"), and "3 fingers under" = which is exactly as says, all three fingers under the arrow nock. With split finger, the most amount of string pressure is on the mmiddle and ring fingers ... for 3 fingers under, the most amount of string pressure is on the pointer and middle fingers. 3 fingers under has become very poplar as it allows the arrow to be closer to the aiming eye, and it allows "string walking" where the string is gripped anywhere between under the string nock point to inches below that string nock point. This allows using the arrow point for "point on" aiming at all target distances. Most newbie archers typically are taught the 3 fingers under method of string grip as it usually is easier for learning aiming, at least at short distances.
Aiming an archery bow means using some form
of sighting, and there are three basic types - hard sight, soft sight
and instinctive. "Hard sight" means using a moveable sighting device
attached directly to the bow. This is fine for target archery and known
target distances but nearly useless for traditional bowhunting with
unknown target distances. "Soft sight" means any aiming methodology
that employs aligning some part of the arrow or bow as a reference to
the target. Using the arrow point as distance reference to the target
(gap aiming) or placing the arrow point on a fixed object (point of aim)
are two soft sight aiming methods. "Instinctive" means looking only at
the target and disregarding both the arrow and the bow - this is
analogous to throwing a baseball or football or dart. This is by far
the most used aiming method for traditional bowhunters.
"Subjective Choice" - this can only best be
based on experience. Do not "think" something is "best" for you - go
out and try it, if at all possible. This subjectivity applies to both
archery tackle and shooting form/style.
FINGER PROTECTION
Pulling back a bowstring, even one on a light draw
weight bow, will hurt your string drawing fingers sooner than later.
The principle form of finger protection is a leather glove or tab.
Subjectivity rules here - try both styles of finger protection and
employ the one that feels best to you. Typically, gloves will have less
"string feel" imparted to the fingers, particularly if the glove is a
made from thick and/or stiff leather. Thinner gloves made with very
supple leather have really good string feel, and typically sport a much
higher price tag. Even a cheap leather tab will typically have good
string feel, and perhaps a better perceived "connection" to the string.
Choose whatever feels and works best for you.
THE BOWSTRING
Modern stick bows are almost always crafted to use modern low stretch, low creep string fibers. The High Modulus PolyEthylene
(HMPE) fibers (Fast Flight, DynaFlight, 450+, etc) have fiber trade
names such as Dyneema, Vectran and Spectra. Older bows aren't built to
handle HMPE string fibers and should only use bowstrings made from
Dacron fiber. Make sure that the brace height of the bow falls within
the range dictated by the bow's manufacturer. It doesn't matter at all
if the bowstring type is Flemish or endless.
It's more in a newbie's favor to use a modern stick
bow since that will allow the use of modern string fibers. As
mentioned, HMPE strings are more consistent and stable and that means
both better accuracy and less to blame on your equipment when accuracy
and form issues arise. Almost all older, vintage type bows are not safe
to use modern low stretch/creep string fibers - stick with Dacron
(polyester) for those older bows.
THE BOWSTRING NOCK POINT
Use a bowstring square or a sheet of folded
newspaper to find where the bow's arrow shelf lines up with the string
at 90 degrees. Roughly 3/8" to 3/4" above that is a decent starting
point for the arrow's nocking point (arrows nock under that nocking
point). Adjust the nocking point up or down until there is no up/down
("porpoising") of the arrow in flight as it leaves the bow. Use a metal
nock point for ease of adjusting purposes. Later on, replacing that
metal nock point with a tied-on and glued thread nock point will make
for a tad faster string, and one that's less likely to chew up your
shooting glove or tab.
THE ARROW
Of all archery tackle, the arrow is absolutely most important
- certainly far more important than the bow. Whatever your holding draw
weight, you want an arrow that will fly well out of your bow. Arrows
that don't fly straight and true are less efficient and less accurate
than ones that do fly well. Efficient arrows with sharp cut-on-contact
broadheads that fly true to the spot on an animal will kill that game
faster than any other type of arrow criteria. Read that again.
Matching an arrow to a given bow and archer is a
task not for this article. Arrow shaft materials are wood, aluminum,
fiberglass and carbon. It's recommended to at least initially stay away
from wood arrows - they will be too inconsistent, are affected by the
environment, and require constant attention to straightening - not to
mention they are just not as durable as man made material arrow
shafting. Use either aluminum or carbon arrows. Aluminum arrows will
be the easiest to tweak for matching to a given bow. However, carbon
shaft arrows are the most durable and consistent, and can be fairly easy
to match to a bow (see note below), and offer the greatest range of
weight and spine for any given shaft size. Yes, there are LOTS of folks
that would argue differently - but day in and day out, carbon shafting
has more than proved itself for bowhunting. An extremely important
aspect of carbon arrows is shot after shot consistency in terms of shaft
straightness - no other shaft can compare in that quality. This is a
very important factor for a newbie archer - the more consistent your
arrows and other tackle, the more you'll know where the blame goes when
you have accuracy issues. Note that whatever your draw length, the arrow
needs to be at least 1/2" longer, but can be 2" or more longer if need
be.
Note - when it comes to carbon arrow shafts, do not
rely on manufacturer's "spine charts". Carbon shafting is just
different than aluminum and wood, when it comes to stiffness ('spine')
and their static spine is quite different than their dynamic spine.
Going lower in carbon shaft spine is almost always better than the chart
recommendations. There's a reason why carbon shaft spine ratings are
very broad for any given carbon shaft (i.e. - 35#-55# spine rating for
one shaft type).
Getting an arrow to fly well out of a bow
begins with choosing a completed arrow that's as closely matched to both
the bow and archer as possible. Newbie archer/bowhunters should always
seek knowledgeable help in arrow selection. This is extremely
important. Attempting to excel in archery/bowhunting with less than
optimum flying arrows is a sure way to fail, or at least make your
journey unnecessarily hard - and expensive. Please read that again.
THE BROADHEAD
For traditional
bowhunting, choose a twin, triple or four blade cut-on-contact
broadhead. Lots of popular brands and models. If they're super sharp,
they'll kill well if you do your job. Lots of info abounds on broadhead
sharpening and attachment methods. Screw-in or glue-on? With carbon or
aluminium arrows, glue-on broadheads allow point weight adjusting by
using different point adapter weights, thus adjusting the overall point
weight, which allows tweaking the arrow's spine (stiffness), GPP (Grains
Per Pound - divide the arrow's weight in grains by the bow's holding
weight) and FOC (Front Of Center - the precise balance point of the
completed arrow).
SHARPENING BROADHEADS
Whether two or three blades, the results should be a razor sharp broadhead or knife that's capable of shaving hair.
THE FLETCHING
Above all, have fun!
Please feel free to email me for further assistance ... TG Admin
SHARPENING BROADHEADS
Once an archer can consistently make accurate arrow
shot placements at realistic hunting distances, the payload delivered
must be a razor sharp cut-on-contact broadhead. Arrows lethally kill
critters via blood loss. A really sharp broadhead arrow in a critter's
vitals promotes maximum bleeding and a quick, ethically humane animal
death. Getting a broadhead *sharp* means raising a burr on the blade
edges, then very lightly removing that burr to reveal the razor's
shaving edge. At the very least, to do this properly (raise the burr)
requires a good mill bastard file, setting a good blade angle, and some
practice. Much can be found on the web about hand sharpening broadheads
and knives, including the "How To - Resources" forum at www.TradGang.com.
There are a number of sharpening tools that can
take the blade angle setting guesswork out of the sharpening equation. A
highly recommended twin blade (and four blade) sharpening tool is the KME Knife Sharpener,
which will sharpen both twin and four blade broadheads with the same
precision it will sharpen knives. Really sharp knives are another
requirement for dressing out your kill, so the KME affords double duty
for one price tag.
Tri blade broadheads are best sharpened on a 12"
flat mill bastard file. Lie the head flat down on the file, with the
point of the head facing the handle of the file, and push. Be
aggressive, particularly if the blades are not dead straight - make them
straight. To hasten this process, a 120 grit sanding station or belt
sander can be used to both flatten the blades and lightly remove the
needle point found on most 3 blade broadheads - lift up the rear of the
head and slightly "pyramid" the tip. Whether sander or file, rotate the
blades to make uniform passes. When your fingers can feel the burr
forming, make a few more passes. Then very lightly swirl off the burrs
with a fine oil stone or diamond stone - use no pressure, allow the
stone to do the work.
The most important tip for sharpening any type of
blade is this: 90% of sharpening anything is accomplished at the
coarsest stage, be that a file, belt sander or your coarsest stone. If
we don't get the blade sharp (and I mean VERY sharp) right at stage one,
then moving on to finer grits will only polish the bevels and it will
not get the blade any sharper. (translation - your coarsest file or
stone is your best friend).
Whether two or three blades, the results should be a razor sharp broadhead or knife that's capable of shaving hair.
THE FLETCHING
Feathered fletches say "traditional archery" and
are the easiest, most forgiving, and perhaps the most efficient to use.
The feather's "wing" (left or right), doesn't matter as long as the
feathers/fletches used for each arrow are of the same wing. For a
hunting arrow that pushes a broadhead, a large 5" fletch is recommended,
aligned with as much offset or helical as possible, in either 3 or 4
fletch configuration. How they're stuck on (glue or tape), is also just
personal subjective stuff as all will work one way or another.
Practice does make perfect. Roving is great
practice for bowhunting. Use judo points and take shots at varied
objects (tree stumps, bushes, cow pies, grass clumps) at varied
distances and angles. The only game better than roving is BOW HUNTING!
Above all, have fun!
Please feel free to email me for further assistance ... TG Admin